Floor and installation plays a crucial role in the overall appearance, durability, and functionality of any space. Proper installation ensures that floors not only look good but also last longer and perform well under daily use. Different types of flooring, such as hardwood, vinyl, laminate, or carpet, require specific techniques and preparation to achieve the best results.
Successful floor installation depends on accurate measurements, appropriate subfloor preparation, and using the right materials and tools for the job. This helps avoid common issues like uneven surfaces, gaps, or premature wear. Whether it’s a residential or commercial project, expert installation is essential to maximize the investment in new flooring.
Understanding the basics of floor installation can help homeowners make informed decisions, reduce costly mistakes, and find the right professionals for the task. Knowing what to expect and how to prepare increases the chances of a smooth and lasting flooring upgrade.
Types of Flooring and Installation Methods
Flooring options vary widely, each requiring specific installation techniques to ensure durability and proper fit. Understanding these methods helps in selecting the right flooring for the space and conditions.
Hardwood Flooring Options
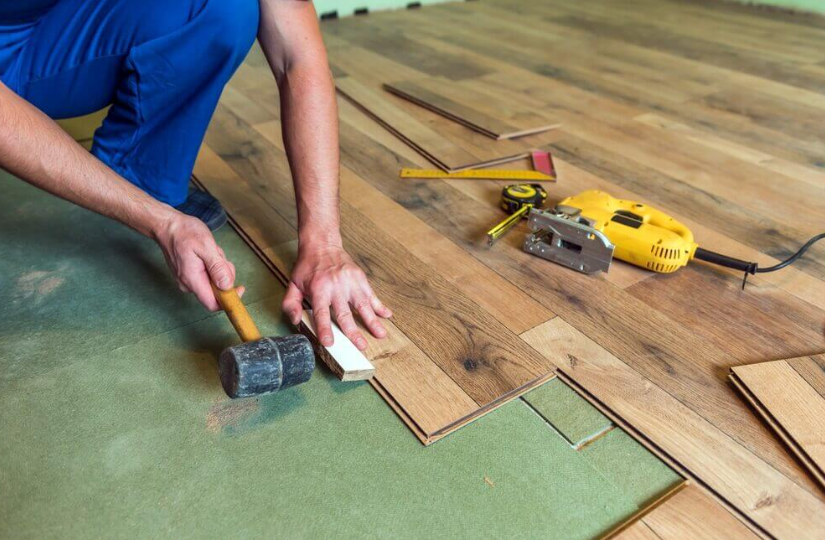
Hardwood floors often use the nail-down installation method. This involves securing each plank to a wood subfloor with nails or staples. It provides a very stable and durable surface but requires a flat, rigid base.
Engineered hardwood can use a floating floor method, where planks are interlocked but not nailed or glued to the subfloor. This allows for slight movement and can be installed over various subfloor types.
Both hardwood types require acclimation to room temperature and humidity before installation to avoid warping. Proper finishing and sealing complete the process for long-lasting protection.
Laminate and Vinyl Choices
Laminate and vinyl floors typically use a floating installation method. Planks or tiles click together easily without adhesives or nails, making the process faster and less intrusive.
Vinyl can also be installed using glue-down techniques, especially for sheets or tiles. This creates a firmly attached surface ideal for high-traffic or moisture-prone areas.
Both materials usually require a smooth, clean subfloor. Underlayment may be used to reduce noise and provide moisture protection, depending on the manufacturer’s recommendations.
See also: Custom Home Builder Guide Tips for a Seamless Construction Experience
Tile and Stone Flooring Installation
Tile and stone floors demand a different process called thin set installation. Tiles are set into a thin layer of mortar or adhesive spread on the subfloor, ensuring a tight bond.
This method requires skill to maintain even spacing and level surfaces. Grouting follows the setting process to fill gaps and secure tiles.
Subfloor preparation is critical and often involves adding a cement backer board for stability and moisture resistance. These floors are durable but require more time and expertise for installation.
Carpet and Alternative Materials
Carpet installation typically uses stretch-in methods, where padding is laid first, then the carpet is stretched over tack strips at the room’s edges. This provides cushioning and a secure fit.
Carpet tiles can also be installed using adhesive for easier replacement and flexibility.
Alternative materials like cork or bamboo may use glue-down or floating floors depending on their construction. These choices offer environmental benefits but require strict adherence to installation guidelines to avoid damage.
Best Practices for Floor Installation
Proper preparation, the right tools, and an informed choice between professional and DIY installation all affect the success of a flooring project. Attention to detail in each area prevents costly mistakes and ensures durability and aesthetics.
Site Preparation and Planning
Site preparation begins with a thorough inspection of the subfloor. It must be clean, dry, level, and structurally sound to prevent issues like uneven surfaces or moisture damage. Any existing flooring should be removed, and repairs made to cracks or holes.
Planning includes measuring the room accurately and ordering about 5-10% extra flooring material to allow for cuts and mistakes. Acclimating certain materials, such as hardwood, to the room’s temperature and humidity for at least 48 hours helps prevent warping after installation.
Proper site preparation reduces installation delays and maximizes the life of the floor.
Tools and Materials Checklist
Essential tools vary by flooring type but generally include tape measures, levels, utility knives, spacers, tapping blocks, and mallets. Adhesive or fasteners should be suitable for the specific flooring material and subfloor type.
For hardwood and laminate, underlayment with moisture barriers is critical. Tile installation requires mortar, grout, spacers, and a tile cutter. Safety gear, such as gloves and knee pads, protects the installer during the process.
Creating a checklist before starting ensures nothing essential is missing, avoiding interruptions and rework.
Professional vs DIY Installation
Choosing between professional or DIY installation depends on skill level, budget, and flooring complexity. Professionals bring experience in handling site challenges, moisture control, and precise cutting, which reduces the risk of errors.
DIY installation can save costs but requires time, proper tools, and understanding of best practices. Homeowners should assess their ability to follow manufacturer guidelines and accommodate necessary acclimation or subfloor preparation.
For complex materials like tile or hardwood, using professionals often results in better longevity and finish quality. Simpler materials like laminate or vinyl may be suitable for experienced DIYers.